I came across elf cosmetics on Twitter, on my search to find cosmetic companies. When I found out that they are based just down the road from me (and saw the price of their products!) I had to place an order.
With my recent addiction to nail varnish, guess what I bought!
From left to right the colours are: Mint Cream, Smokey Brown & Purple Pleaser. All in the new collection. All cost £1.50 each.
I painted my toes with the mint cream and my hands with smokey brown. The brown polish seemed to go on better than the mint, but I think that's to do with the colour rather than anything else. The polish seemed to dry pretty quickly - great for me as I'm a bit rubbish at sitting still and have a tendency to dent or smudge nail varnish pretty quickly.
The colour of the polish on the website & in real life is pretty accurate for the mint. The brown comes out darker than it looks. The purple is a lot brighter (better). Obviously this is on my monitor and may be very different on your screen!
General consensus (from my Mum) is that the Mint Cream should never be used again - although I do quite like it, but is more of a Summer or highlight colour, and the Smokey Brown is a good colour. Bang on trend!
So, well done Elf - I will purchase again! Am particularly looking forward to the Matt Finisher coming in!
Showing posts with label nails. Show all posts
Friday, 22 October 2010
Saturday, 16 October 2010
Leopard print nails
This is my attempt at Leopard Print nails after seeing GemFatale's blog post & tutorial video.
More practice needed!
Saturday, 9 October 2010
Black Nails (Free Nail Varnish)
This came free with Cosmopolitan magazine. I love free gifts.
It is Black n Gold from Miss Guided.
It has a very delicate gold sparkle, that will be great for Halloween and Christmas parties, but was an absolute nightmare to get off!
Good quality product though.
Tuesday, 5 October 2010
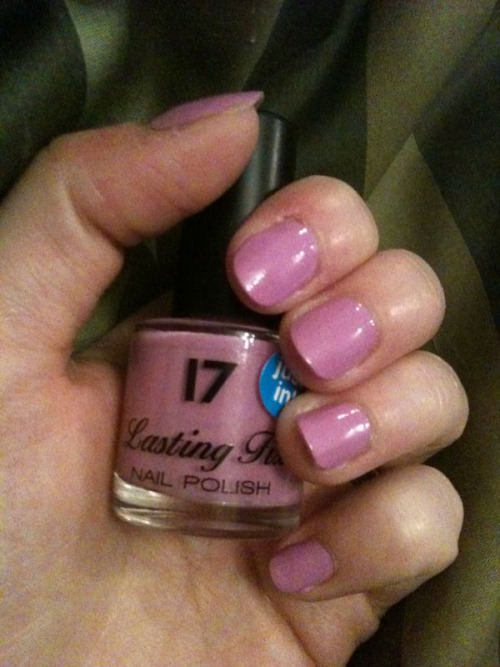
Nails: 17 Lasting Fix (Parma Violet)
I bought this in the Summer (May-ish) to go with my new flip flops.
I have worn this colour a lot over the last few months and don't quite want to let Summer go yet. It's also a fairly neutral colour but adds a bit of fun for work. With my new found want to wear nail varnish & take better care of my appearance, I have (as you know) started wearing a lot more nail varnish. Now I do not profess to be a professional/fashion conscious/any authority at all, but I do know what I like.
This nail varnish is not expensive (at £2.99), but when I first had it went on really well, and even one coat was enough. Now I can tell it's a bit older & used and there are a few bristles on the brush that need sorting out. However, I like it, and its nothing a smidge of nail varnish remover & pair of scissors won't fix!!
Monday, 9 August 2010
Time for a manicure
I'll let you in on a secret. I am a nail biter. I have bitten my nails for as long as I have had them. I've been much better over the last few years and I do think that I have finally (touch wood) dropped the habit. Until I have a drink or two.
So manicures are fairly new to me as I have never had nails to work on and I am a bit rubbish at it. I kind of figure it must just be practice.... so here is my first proper attempt at doing my nails. I will say that I did have a mini manicure at a spa last weekend, so they weren't totally mishapen to start with (luckily for me!)
Before:
Here's what I did.
- Removed any nail varnish with remover, just in case.
- Washed my hands.
- Masaged cuticles with cuticle remover.
- Used an orange stick to push cuticles back.
- Masaged nails with Nails Inc oil slick pen.
- Moisturised hands with hand cream.
And that was just the prep bit!! I didn't realise how much went into it - but my hands did feel lovely and soft! :) Here are the products I used:
Then:
- Filed my nails to an (almost) square tip.
- Used a base coat with some special ingredient to help my nails grow.
- Nail varnish (finally, the fun bit!) in a very dark brown (almost black) with glittery finish.
- Nails Inc top coat to keep the colour safe.
This was the final result:
But I didn't like it. So I took it all off and did this:
And I enjoyed it so much I decided to try again on Sunday and went for blue:
I am sure there is much more detail & information I could add here - but I'll leave that for another post! Any tips to share?
So manicures are fairly new to me as I have never had nails to work on and I am a bit rubbish at it. I kind of figure it must just be practice.... so here is my first proper attempt at doing my nails. I will say that I did have a mini manicure at a spa last weekend, so they weren't totally mishapen to start with (luckily for me!)
Before:
Here's what I did.
- Removed any nail varnish with remover, just in case.
- Washed my hands.
- Masaged cuticles with cuticle remover.
- Used an orange stick to push cuticles back.
- Masaged nails with Nails Inc oil slick pen.
- Moisturised hands with hand cream.
And that was just the prep bit!! I didn't realise how much went into it - but my hands did feel lovely and soft! :) Here are the products I used:
Then:
- Filed my nails to an (almost) square tip.
- Used a base coat with some special ingredient to help my nails grow.
- Nail varnish (finally, the fun bit!) in a very dark brown (almost black) with glittery finish.
- Nails Inc top coat to keep the colour safe.
This was the final result:
But I didn't like it. So I took it all off and did this:
And I enjoyed it so much I decided to try again on Sunday and went for blue:
I am sure there is much more detail & information I could add here - but I'll leave that for another post! Any tips to share?
Subscribe to:
Posts (Atom)